
The Private Chat page allows you to offer one-on-one private coaching with members right inside your online courses.
To Get Started:
- Go to Members Area and then click on the Online Courses.

- In the next screen, click on the Course icon or Content button of the online course that you would like to add the Private Chat page to.

- In the Course Content pop-up, click on +Add New Page.
- Add a Name for your Private Chat page, and from the Course Page drop-down select Private Chat page. Once done, click on +Add.
Your new Private Chat page will appear at the bottom of your Course Page list.
- Next, click on the Edit button (pencil icon) to customize the Private Chat page.

- Once the Page Builder is open, you will see some default Block Elements on the page i.e. a Headline, a Video and Descriptive text. These elements can be customized or removed and replaced with other block elements your prefer. For steps on how to work with Block Elements, simply go to Working with Blocks: Course Pages
- The options on the left sidebar panel will appear as well.

Page Options

- Details
Under Details, if you want to move your Private Chat page to a new course, select the new destination course in the Course drop-down menu.
You may also select the Page Layout for your course page. - Custom Codes
Add codes here. e.g. Facebook Pixel, Google Analytics, etc.
Or select an Audience booster to provide custom header, footer and after body tag codes based on their group. - Page Background
This feature allows you to change the background of your page. - Content Background
With this you can change the background color of the course content. By default, the background color is set to transparent. Select color from the color picker. - Page Spacing
This feature allows you to add more space around your page. - More Options
- Hide Nav Bar
By default, it’s disabled. Once enabled, this will hide the navigation bar in the course page. - Show Coming Soon
If this option is enabled, the Coming Soon text will be displayed all the time.
It’s recommended if you don’t want to display the content on the page.
NB! This option is unconditional. If there’s a drip feed on the page, it doesn’t matter what options are set. Therefore, the Coming Soon text will still be displayed. - Use Default Toggle Image (160 x 100):
This will use the default toggle image to all lesson blocks.
You can click on Browse or Select from gallery.
+ Browse – upload a new image from your computer.
+ Select from gallery – choose from the images that you’ve already used in other pages/templates. - Redirect Page
This will let you redirect members that reach this page to a different page that you can choose from the drop-down. For instructions, please refer to How to redirect a page using Page Options - Redirect based on country
This allows you to redirect visitors to a different URL based on their country when they try to access a specific page.
To learn more about this feature, visit How to redirect users to a different URL based on country using Page Options - Access Based On A Tag
This option will allow you to provide access to your members based on the tag selected in the settings. For in-depth guide, click here. - Page Landing Action
Allows you to apply a specific action as users land on a certain page.
To know more about this feature, visit How to use the Page Landing Action Feature - Open Chat on Landing
It is turned off by default. When enabled, the Private Chat modal will open automatically when someone visits your Private Chat page.
- Hide Nav Bar
Header Image

- The Header image cannot be moved but can be hidden and customized.
Simply click on the Header placeholder and upload the image you prefer in the left-sidebar menu.
+ Browse – upload a new image from your computer.
+ Select from gallery – use an image that’s already been uploaded or been used in another template or page. Upon click, the image gallery popup window will appear with all the available images listed.
Coming Soon Text

- This feature allows you to add teaser text to your course page, when the Course Page Drip Feed feature is enabled. Simply add the text you would like to display at the top of the page and SAVE.
How Private Chat works
Private Chat functions in a similar way to Instant Messaging, in that: 
- Simply click on the OPEN CHAT button.
Once clicked, it will open a pop up showing all the messages.
- You and a specific member can have an IM chat, if you are both online at the same time.
- Comments and replies update in real-time without needing to refresh the Private Chat page.
- To view a member’s question or comment, click on the member’s name and their question or comment will open.
- To reply to a member’s question, simply add your comment in the field provided at the bottom of the Private Questions section and click on Send.
- Previous conversations with that member will also be saved in this section.
Filter the Members
You can filter the members by clicking the filter icon in the upper right corner and entering the member’s name. 
Filter the Private Chat
To filter the private chat, you may use the Filter option and then simply type in the keyword.
 When you enter the keyword, the results will appear on the left side.
- Entering a URL on private chat automatically creates a clickable link. It will open in a new tab upon click.
- Admins and Members can add an Image, Video and/or Emoji to their reply.
+ To add an image, you can use an Image URL, or upload an image directly from your computer (max. 200kb per image).
+ To add a video, simply add the video URL in the field provided. You can use self-hosted videos like Amazon S3, or embed videos hosted on the following platforms: YouTube, Vimeo, Wistia, Facebook, MP4, Loom.
+ To add an emoji, simply click the Emotions icon and the Emoji pop up window will appear.
 + To add an Audio Message, click on the microphone icon and begin recording. Once done, click on the Send button. The default playback speed is 1x, but you can adjust it by selecting a different multiplier from the dropdown menu: 0.25, 0.5, 0.75, 1.25, 1.5, 1.75, 2, 3, or 4.
To cancel the recording, click the Cancel button.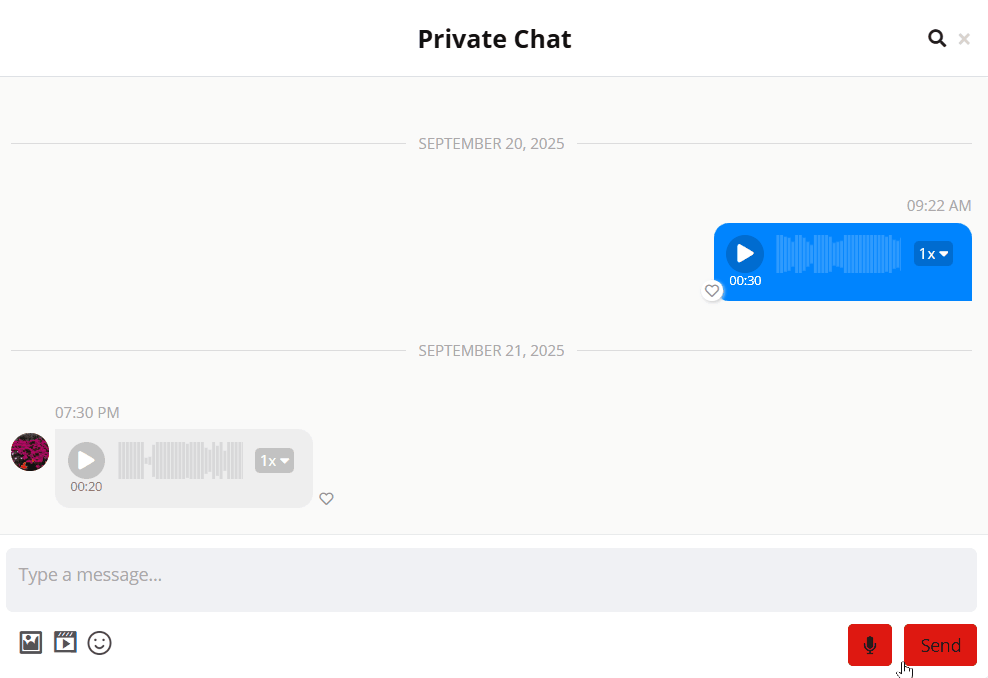
- You have the option to Edit or Delete the message.
When you hover your mouse beside the bubble message, there will be an ellipsis icon. Simply click on it and the options to Edit or Delete the message will appear.
- You have the option to Like a message.
Simply click on the heart button beside the bubble message.
- When you hover your mouse on the avatar, the bio information of the user will pop up.

Admin can Add Note on the Private Chat
- Admin can add some information text that will appear on the private chat screen.
Simply click on the ellipses icon and click on Default Note.
The Default Note will be shown on the screen, simply type the text in the text box and save.

- Admin can customize the note for a specific users.
Just click on the specific user, then click on ellipses icon and click on Edit Note.
The Edit Note will be shown on the screen, simply type the text in the text box and save.

- Notify Member
When the note is edited, you can notify the member using the Notify Member option (browser, app, or notification center). Simply check the box; otherwise, leave it as is. - When a member opens the private chat window, the note will be shown on the private chat screen.

Quote a reply
- Quote specific text on a reply.
You may quote specific text on the message by highlighting the text. Once highlighted, there will be a Quote option that will appear above. When you click on it, the quoted text will appear on the reply.

Private Chat Notifications
- When members leave a comment or question on the Private Chat page, a red icon will appear on the top-right corner of that course in the Online Course Dashboard
- TIP! The number indicated on this icon can include comments from both the Social Wall & Private Chat page. To specifically see where the comments came from, you need to open the course itself.
- When the course is open, in the Course Content pop-up, you will see the same red Icon to the right of the Social Wall or Private Chat page (or both).
- The number indicated on these red Icons show the number of comments that have been left on that page i.e. a number 5 on the icon means 5 comments have been left.
Related Articles
How to update your Admin Avatar
How members can update their Social Avatar