Auto Webinars are basically Webinars that run on autopilot.
To Get Started:
- Go to Boosters, then select Auto Webinars.
You will see the dashboard where all your future Auto webinars will be listed.
- To create a new Auto Webinar, click on the Plus (+) icon on the upper right hand corner.

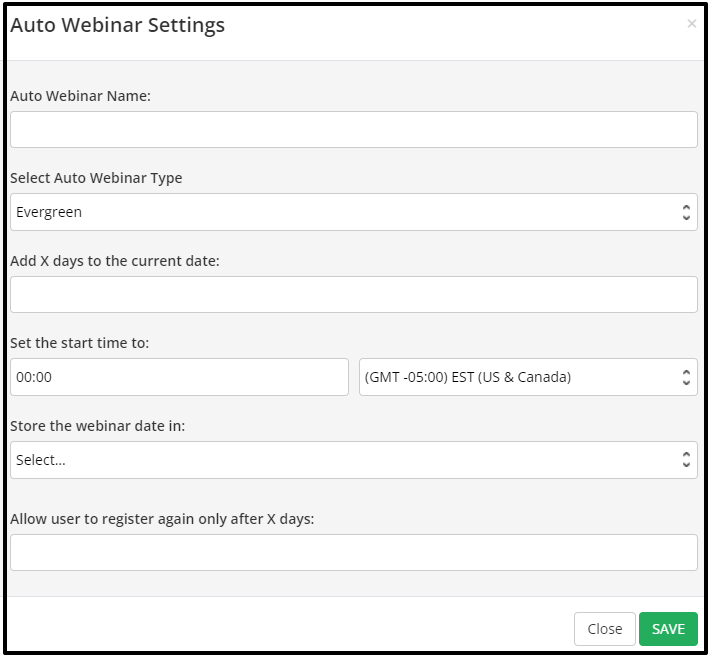
- The Settings pop-up will appear.

- Select which Auto Webinar Type you want
This drop-down gives you four options – Evergreen, Just in time, Weekly, and Multi. - Click on the relevant link below for further steps
Evergreen Auto Webinar
An Evergreen Auto Webinar is a never ending webinar, that forever repeats and works on autopilot. + How to setup an Evergreen Auto Webinar
Just in Time’ Auto Webinar
Any time a customer accesses the Auto Webinar Registration page, they will always be Just in Time for the next webinar. + How to setup a ‘Just in Time’ Auto Webinar
Weekly Auto Webinar
A Weekly Auto Webinar is a webinar that happens once a week at the same date and time.
+ How to setup a Weekly Auto Webinar
Multi Auto Webinar
A Multi Webinar allows you to offer your customers multiple date and time options to sign up for the webinar. This includes offering a mix of Just in Time and Evergreen Webinars to choose from. + How to setup a Multi Webinar
Back in the Auto Webinar dashboard, you can:
- Edit existing Auto Webinars by clicking on the Edit (pencil) button to the right.

- Duplicate existing Auto Webinars by clicking on the Duplicate (copy) button to the right.

- Manage your webinar questions by clicking on the Questions (?) button.
For complete guide on how to add webinar questions manually, please proceed on the guide below.
How to Manually add Questions to Auto Webinars

- Delete existing Auto Webinars by clicking on the Delete (x) button to the right.

Related Articles
Step 1- Setup your Auto Webinar
Step 2 – Setup your Auto Webinar Registration Page
Step 3 – Create an Auto Webinar page
How to Register users to an Auto Webinar Page using a Webhook
Auto Webinar Page Customizations
Managing Your Webinar Questions
