
Webinar Images
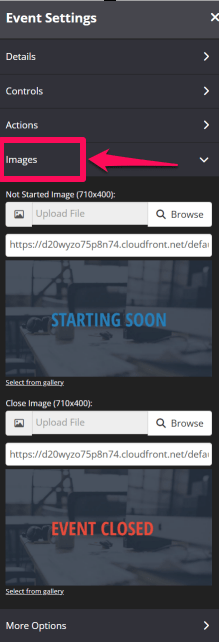
You can change the images for your Auto Webinar by simply uploading new Not Started and Event Close images in the fields provided.
- Go to Event Settings and then click on the Images.
- The required dimensions are 710x 400px (JPG or PNG format)
- If you prefer not to add custom images, the default images provided in the Events Settings section will be used.
Integrations
To customize your webinar further, you can use your integrated emailing system tags or webhooks to track which members have attended the webinar, who has seen the buy button and who has watched the webinar to the end.
To Do This:
- Click on Event Settings in the left-sidebar menu and select Actions.
- In the Event Status Action dropdown menu choose either your emailing system or Send Webhook.
Apply Tags
From the drop-down menu under the following sections, select the relevant Tag or create a new tag by scrolling to the bottom of the drop-down menu and selecting Create New Tag.
+ Event Starts Tag
When the Webinar starts, this tag will be added to the member’s profile in Infusionsoft
+ Button Appears Tag
When button appears during webinar, this tag will be added to the member’s profile in Infusionsoft
+ Event Ends Tag
When the Webinar ends, this tag will be added to the member’s profile in Infusionsoft
Send to Webhook
+ Event Starts Webhook URL
When the Webinar starts, this info will be sent to your system via the provided webhook URL
+ Button Appears Webhook URL
When button appears during webinar, this info will be sent to your system via the provided webhook URL
+ Event Ends Webhook URL
When the Webinar ends, this info will be sent to your system via the provided webhook URL
Related Articles
Step 2 – Setup your Auto Webinar Registration Page
Step 3 – Create an Auto Webinar page
How to Register users to an Auto Webinar Page using a Webhook
Auto Webinar Page Customizations
Managing Your Webinar Questions