
If you want to allow your users to upload larger images as well as sending Audio message in chat features then you want to integrate your site with your own Amazon S3 account
If you are an existing user who has previously integrated with Amazon S3, you can use the same bucket; however, you must create a new user, correctly configure the policy, and ensure the correct bucket name is in the policy.
Also ensure that you update your admin settings with the new key and secret.
To do this:
Step 1: Create an IAM user in your Amazon Account
-
- Log in to your AWS Management Console using your root account credentials. You can access the AWS Management Console here: https://aws.amazon.com/console/
- Click on the Services drop-down menu at the top of the page.
 and select IAM under the Security, Identity, & Compliance category. Alternatively, you can access the IAM service directly using this link: https://console.aws.amazon.com/iam/

-
- In the left-hand menu, click on Policies and then click on the Create policy button.


-
- On the Create policy page, select the JSON tab.

-
- Paste the following policy document into the editor:
{

"Version": "2012-10-17",

"Statement": [

{

"Sid": "VisualEditor0",

"Effect": "Allow",

"Action": [

"s3:PutBucketPublicAccessBlock",

"s3:PutBucketPolicy",

"s3:PutObject",

"s3:GetObjectAcl",

"s3:GetObject",

"s3:DeleteObject",

"s3:PutBucketNotification",

"lambda:GetLayerVersion",

"s3:CreateBucket",

"s3:GetMetricsConfiguration",

"s3:GetBucketAcl",

"lambda:GetLayerVersionPolicy",

"s3:GetBucketPublicAccessBlock",

"s3:GetBucketLocation",

"s3:PutObjectAcl",

"s3:PutBucketCORS"

],

"Resource": [

"arn:aws:s3:::YOUR-S3-BUCKET-NAME/*",

"arn:aws:s3:::YOUR-S3-BUCKET-NAME"

]
},

{

"Sid": "VisualEditor1",

"Effect": "Allow",

"Action": [

"iam:CreatePolicy",

"lambda:CreateFunction",

"logs:CreateLogStream",

"iam:PassRole",

"lambda:AddPermission",

"lambda:GetLayerVersion",

"lambda:PublishLayerVersion",

"iam:CreateRole",

"iam:AttachRolePolicy",

"s3:ListAllMyBuckets",

"logs:CreateLogGroup",

"logs:PutLogEvents",

"lambda:UpdateFunctionConfiguration"

],

"Resource": "*"

}

]
}

-
- In the code replace YOUR-S3-BUCKET-NAME with the name you want to use for your Bucket. You can pick any name we will later use that name as the name of the bucket that will be created on integration.
IMPORTANT: Bucket name must be globally unique and must not contain spaces or uppercase letters. For more information, please check Bucket naming rules.
For example if you pick sitefiles1234 as the bucket then your policy should be like this:
- In the code replace YOUR-S3-BUCKET-NAME with the name you want to use for your Bucket. You can pick any name we will later use that name as the name of the bucket that will be created on integration.

-
- Click on the Next: Tags button.
- Click on the Next: Review button.
- Give the policy a name (e.g. “KLQS3AccessPolicy”), and then click on Create policy.

-
- In the left-hand menu, click on Users and then click on the Add Users button.


-
- Enter a username for the new IAM user. Then click on Next.

- On the Set permissions page, select Attach policies directly and then search for the policy you just created.
- Select this policy by checking the checkbox next to it.
- Click on Next.

- Review the user details and permissions, and then click on Create User.

- Click on the username of the IAM user you just created.

- On the User details page, click on the Security credentials tab.

- Under the Access keys section, click on the Create access key button.

- On the Access key best practices & alternatives page select Application running outside AWS option. Then click on Next.

- Click on the Create access key button.

- The Access Key ID click on Show to display the Secret Access Key

- Make sure to copy and save these values in a secure location, as they will not be displayed again and you will need them to authenticate with the AWS API.

- Once you have copied the Access Key ID and Secret Access Key, click on the Done button.
Step 2: Add your Access Keys to Your Website
- Go to Settings and then click on the Integrations.

- Scroll down to the Other Systems section. Once there, you will see the Amazon S3 section available.

- Expand the Amazon S3 section.
- Add your access key and secret here:

- Next select a region for the bucket that will be created (Pick location where most of your users are located)
- IMPORTANT: In the field Bucket Name, Paste the EXACT same name you used earlier in the user policy
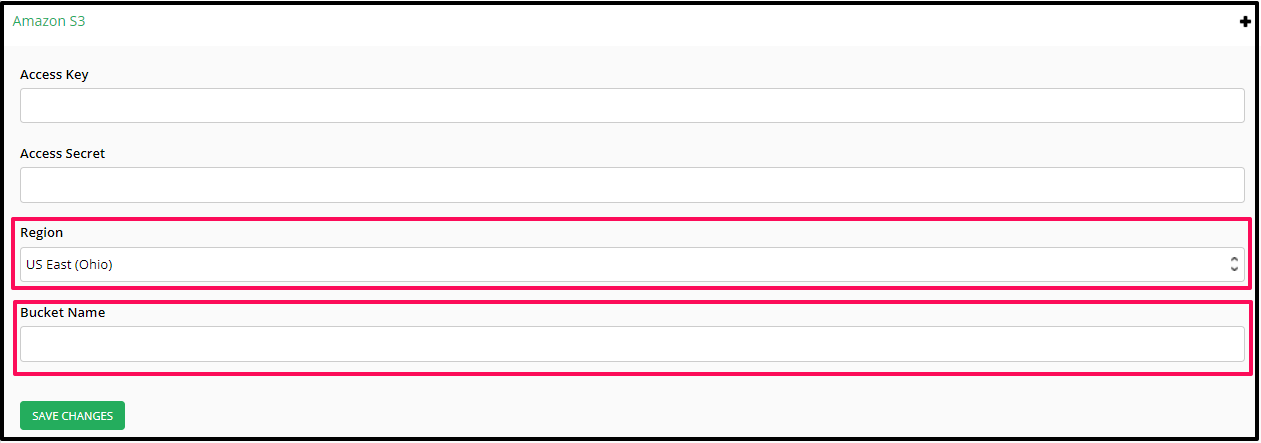
- Click on SAVE CHANGES.
Your website will now connect with Amazon S3 and setup the different functions to upload files. Note this can take up to 30 minutes so do not click on the button again.
You may want to check the max file upload size for S3 in this article: https://aws.amazon.com/s3/faqs/
Related Articles
How to setup a Video Block
How to Create an Amazon S3 Bucket
How to Upload your Files to Amazon S3
How to report an issue with your S3 Integration