
Launch menus are very important for your Launch pages.
Step 1 – Create Your Launch Pages
To get started, first setup the Launch pages for your campaign. Usually in a Launch you have 4 pages. Three of them are your Launch (value) pages and the 4th one is usually your Sales page.
- Go to Campaigns in left-sidebar menu
- Click on +Add New Page
- Select a name for your Launch Page
- Under the Page Templates drop-down, select Launch Pages
- Select the Launch Page Template
Create 2 additional Launch Pages by replicating the steps above.
Add a Sales page by selecting one of the Sales page templates from the page template menu.
At this stage it is not necessary to add the content to you Launch pages
You simply need the pages ready so that you can setup your Launch menu.
Step 2 – Create your Launch Menu
Next, you need to setup your Launch menu.
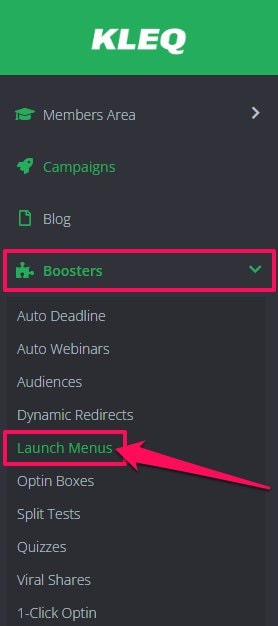
- Go to Boosters, then select Launch Menus.
- In the Launch Menus dashboard, click on the Plus (+) icon on the upper right hand corner.

- In the next screen, give your menu a name
Then manage the content of your Launch menu:
- Setting up a Live Launch
If you want create a Live Launch, follow these steps:+ Under the Page 1 section, click on the Activate checkbox to enable the page Important, in a live launch some of the pages will not be immediately accessible. However in the Launch menu settings, all pages included in the launch must be activated in order for them to be visible on the Launch page.+ From the Page drop-down, select the 1st Launch page you setup in step 1 above+ Give the Page 1 section a Navigation label e.g. Video 1
This label is what will appear in the Navigation menu at the top of your Launch page.
If you don’t add a navigation label, the original page name is shown by default.+ Upload a Navigational thumbnail
This image will appear in your pages top navigation (optional). If no custom navigation image is uploaded, the default image will be used instead.+ Launch pages have two different statuses – Active or Coming Soon status+ If you select Coming Soon in the Pages drop-down, then the navigation thumbnail will be visible, but not clickable.
+ If you select a page in the Pages drop-down, the navigation thumbnail will be clickable and the launch page can be accessed.
+ When you are ready to launch your pages, simply change the page setting from Coming Soon to the relevant Launch page.
For steps to setup a Perpetual (Evergreen) Launch, go to Setting up an Evergreen Launch
- Once all your Launch pages have been setup, click on SAVE.
Back in the Launch Menu dashboard, you can:
- Edit existing Launch Menus by clicking on the Edit button to the right of the menu.
- Duplicate existing Launch Menus by clicking on the Duplicate button to the right of the menu.
- Delete existing Launch Menus by clicking on the Delete button to the right of the menu.
TIP! To redirect users when the Launch pages are no longer available, simply enable the Redirect all Launch Pages feature and then select the page you would like users redirected to.
Step 3 – Link Launch Menu to Launch Pages
- Go back to your Launch pages setup in the Campaigns section.
- Open your first Launch page.
- Once opened, click on the top navigation menu.
This will open your navigation settings in the left-sidebar menu. - Under Launch Menu drop-down, select the Launch Menu you just created.

- Once you are done, click SAVE.
Repeat these above steps for each Launch page that you want to include in the launch
(i.e. 3 Launch Pages)
Once done, the Launch Page will now show your Launch menu.