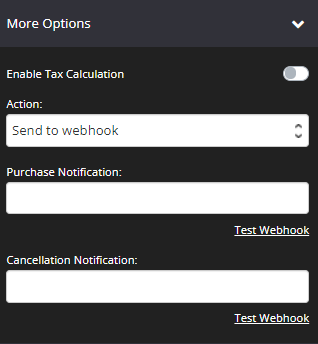
Order Pages have the following drop-down under
More Options

Send to webhook
This setting is ideal if you want to send notification to your system via a webhook URL. Choosing Send to webhook will enable both Purchase Notification and Cancellation Notification.
-
Purchase Notification
This option allows us to send a notification each time a purchase has been made.
To do this, simply add your preferred webhook URL and we will send the user data to that URL.How this Works: When users submit their details for their payment in the Order Page, the payment for the Product goes through PayPal or Stripe. At the same time, we will send information to your system through the webhook URL.
-
Cancellation Notification
This option allows us to send a notification each time a purchase is canceled.
To do this, simply add your preferred webhook URL and we will send the user data to that URL.How this Works: When users cancel their purchase or did not complete their purchase, we will send information to your system through the webhook URL.
Setting up your Zap
- Signup for a Free Zapier account
- Once your account has been setup, you will be able to create a Zap.
A Zap is an automated workflow between your apps, which consists of at least two parts: a Trigger and one or more Actions. - In your Zapier dashboard, click on the Make a Zap button at the top of the page.
- In the next screen, you may change the name of your Zap by clicking Name your zap in the upper left corner.

- In the same screen, you are going to select a trigger.
Under the Choose App drop-down menu, select Webhooks by Zapier.
Under the Choose Trigger Event drop-down menu, select Catch Hook.
Then, click Continue.

- In the Customize Hook section, Zapier is going to give you a Webhook URL.
Simply click on the Copy button.
Under the setting that says Pick off a Child Key, leave these settings as is and click on Continue.

Testing your Webhook
- In the Find Data section, click TEST & CONTINUE.
- Go back to KLEQ page.
- In the feature you want to use, you will see a field to insert the webhook URL.
Simply paste the webhook URL from Zapier in your KLEQ Order Page. - Click on the Test Webhook link. You will see that it loads.

- Once done, click on SAVE.
- Go back to Zapier.
- Go to Find Data section, now you should see a new item that says Hook A.
This means that Zapier received the Webhook sent from KLEQ.
To see the test data, click the Hook item. - Once done, click on Done Editing.

After you have finished setting up your Webhook trigger, you can choose what to do with the information sent by KLEQ. Basically, you need to set up an “Action”.
NB! The information being sent through this method is whatever you ask you customers to fill out in the Order Page: “First Name”, “Last Name”, “Email”, “Phone”, “Address”, “City”, “State”, “Country”, etc.
