
The Hybrid Webinar is a pre-recorded webinar that only happens on a specific date and time. This gives the feel of a Live Event with the convenience of an Automated Webinar.
Setting up your Hybrid Webinar Page
- Go to Campaigns, then select the relevant Campaign you want to add your webinar to.
Click on + Add New Page. - Add a name for your Auto Webinar Page.
Under Page templates, select Webinar pages.
From the template screen, select Hybrid Webinar. The new page will load.
- Once opened, go to Event Content and then click on Video in the left sidebar panel.
This will open the Video settings.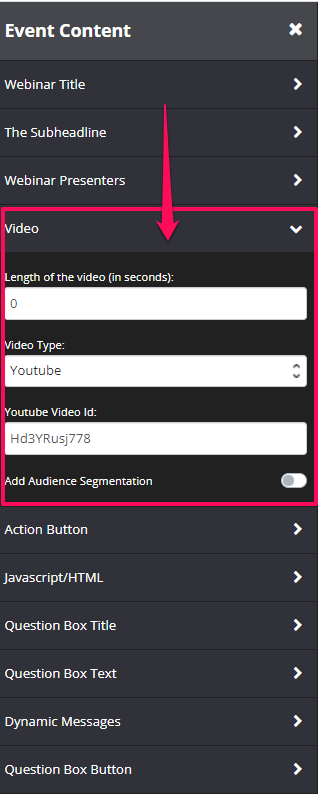
- Under Length of the video (in seconds), add the length of the video.
This will allow us to know where to begin playing the video i.e. if somebody arrives on time for the webinar, they will watch it from the beginning. If somebody arrives 30 minutes late, then they will begin watching the video 30 minutes in. This is done to replicate the feel of a live webinar. - Under Video Type, you have 3 options.
YouTube
If your video is hosted on YouTube, select this option from the drop-down menu and under YouTube Video ID, add the YouTube ID of the pre-recorded video
Vimeo
If your video is hosted on Vimeo, select this option from the drop-down menu and under Vimeo Video ID, add the Vimeo ID of the pre-recorded video.
Video URL
If your video is hosted on a platform like Amazon S3 or Wistia, then select
Video URL from the Video Type drop-down and paste your video URL in the field provided.
Once done, click on SAVE.
- Back in the Hybrid Webinar Page Settings, click on the Button placeholder
The Button settings will appear in the left-sidebar menu - Under Delay in Seconds, add the time delay in seconds before button appears during the webinar.
- Under Link, add the URL for the button
- Once done, click on SAVE.
Controlling your Hybrid Webinar
- Back in the Hybrid Webinar Page settings, click on Events Settings in the left-sidebar menu
- Under Event Time, select the date, time, and time zone when your Webinar will start.
- You have options to control the webinar action button and when customers are able to submit questions.

+ Show Button When Not Started
When enabled, the button will show on the page even if the webinar has not yet started.+ Show Button When Live
When enabled, this will allow you to add the time delay in seconds before the button appears during the webinar.+ Show Button When Closed
When enabled, the button still appears on the page even though the webinar has been closed.+ Enable Question When Not Started
When enabled, the question box appears on the page even though the webinar has not yet started.+ Enable Question When Live
When enabled, the question box appears on the page when the webinar starts.+ Enable Questions When Closed
When enabled, the question box appears on the page even though the webinar has been closed.
Tracking Event Status Action
You can track who attends the live Event, who sees your Buy button or who stayed to the end of the Event, by enabling the Event Status Action feature in the Event Settings section. This can be done using Infusionsoft or Active Campaign tags or even a Webhook URL.
Apply Integrated Emailing System Tag
If you select Integrated Emailing System Tag, tag list drop-down will appear under the following fields:
Event Starts Tag
Button Appears Tag
Event Ends Tag
- Simply select the relevant tag for each field
If you need to create a new tag, scroll down to the bottom of the drop-down and click on Create New Tag. Once done, select the tag. - Click on SAVE.
Send to webhook
If you choose Webhook, a webhook URL field will appear under the following fields:
Event Starts Webhook
Button Appears Webhook
Event Ends Webhook
- Simply add the relevant Webhook URL you’ve setup for each field.
- Click on SAVE.
Once done, that’s it! Your Hybrid webinar is setup and will automatically run on the date and time selected.