
The Order Bump Block allows you to add single payment products to your Order pages, that compliment the main product that you have on offer. It’s an upsell included directly in your main Order Page.

Once set up, users will be able to add the upsell to their main order just before completing the checkout page.
To Get Started:
- Open the Order Page where you would like to add the Order Bump.
- Once open, in the Preview pane of your Order Page, click on the black (+) icon above where you want the bump added.

- The Block menu options should appear in the left-sidebar menu

- Scroll down to the Order Bump block and click to add to your Order page.
The Order Bump Block will appear in the Order page and the formatting tools will appear in the left-sidebar menu. - Once you are happy with the layout of your Order Bump Block, click on the SAVE button.
This will take you back to the main menu options for your page. - Select Order Bump Settings from the left-sidebar menu
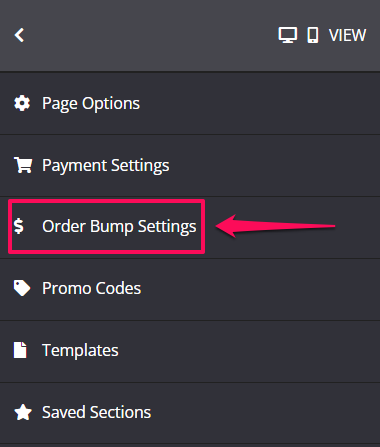
- The settings section will now appear, simply complete the following fields:
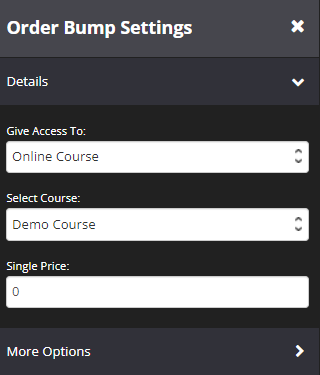
Details
- Give Access To
From this drop-down, you can choose if you want to give the user access to an Online Course, Forum, Bundle or External Product.Depending on your above selection, the relevant drop-down menu will appear for you to choose the Online Course, Bundle or External Product that you have setup. - Single Price
Once your product is selected, add in the price for your Order Bump.
NB: The Order Bump Block does not support Payment plans or Subscriptions.
More Options

Purchase Action
This action will be applied each time an order bump purchase has been made. Simply enable the toggle ON and Purchase Action drop-down button will appear. Some of the options in the Action drop-down will depend on the systems you have integrated on your KLEQ website. For example, if Drip is not integrated with your KLEQ site, the Apply Drip Tag option will not appear in the Action drop-down list. 
Select Action
When there is an order bump purchase, you can apply the integrated emailing system’s tag to the user’s profile. Simply select the relevant tag from the drop-down menu.
- Infusionsoft Tag
When there is a purchase, you can apply any Infusionsoft tag to the user’s profile.
Simply select the relevant tag from the drop-down menu.
To create a new tag for this purpose, simply scroll down to the bottom of the menu and click on Create New Tag.
- Active Campaign Tag
When there is a purchase, you can apply any Active Campaign tag to the user’s profile.
Simply select the relevant tag from the drop-down menu.
To create a new tag for this purpose, the tag must first be set up in your Active Campaign account. Once done, it will immediately appear in the Active Campaign drop-down. - Aweber Tag
When there is a purchase, you can apply any AWeber tag to the user’s profile
Simply select the relevant tag from the drop-down menu. - ConvertKit Tag
When there is a purchase, you can apply any ConvertKit tag to the user’s profile.
Simply select the relevant tag from the drop-down menu.
To create a new tag for this purpose, simply scroll down to the bottom of the menu and click on Create New Tag. - Drip Tag
When there is a purchase, you can apply any Drip tag to the user’s profile.
Simply select the relevant tag from the drop-down menu.
To create a new tag for this purpose, the tag must first be set up in your Drip account. Once done, it will immediately appear in the Drip drop-down. - Ontraport Tag
When there is a purchase, you can apply any Ontraport tag to the user’s profile.
Simply select the relevant tag from the drop-down menu.
To create a new tag for this purpose, the tag must first be set up in your Ontraport account. Once done, it will immediately appear in the Ontraport drop-down. - MailChimp Tag
When there is a purchase, you can apply any MailChimp tag to the user’s profile.
Simply select the relevant tag from the drop-down menu.
To create a new tag for this purpose, simply scroll down to the bottom of the menu and click on Create New Tag. - Add to Flodesk Segment
When there is a purchase, you can apply any Flodesk Segment to the user’s profile. Simply select the relevant segment from the drop-down menu.
To create a new tag for this purpose, the tag must first be set up in your Flodesk account. Once done, it will immediately appear in the Flodesk drop-down after clicking the Refresh segments list… - Add to MailerLite Group
When there is a purchase, you can apply any MailerLite group t to the user’s profile. Simply select the relevant group from the drop-down menu.
To create a new tag for this purpose, simply scroll down to the bottom of the menu and click on Create New Tag. Once done, it will immediately appear in the MailerLite drop-down after clicking the Refresh segments list…
Refund/Cancellation Action
By default, it is turned off. Simply turn the toggle ON, and a Refund/Cancellation Action drop-down button will appear. This action will apply a tag or send a webhook if the purchase is refunded or cancelled.

Apply a Tag
When there is a refund/cancellation, you can apply the integrated emailing system’s tag to the user’s profile. Simply select the relevant tag from the drop-down menu.
- Infusionsoft Tag
When there is a refund/cancellation, you can apply any Infusionsoft tag to the user’s profile.
Simply select the relevant tag from the drop-down menu.
To create a new tag for this purpose, simply scroll down to the bottom of the menu and click on Create New Tag.
- Active Campaign Tag
When there is a refund/cancellation, you can apply any Active Campaign tag to the user’s profile.
Simply select the relevant tag from the drop-down menu.
To create a new tag for this purpose, the tag must first be set up in your Active Campaign account. Once done, it will immediately appear in the Active Campaign drop-down. - Aweber Tag
When there is a refund/cancellation, you can apply any AWeber tag to the user’s profile.
Simply select the relevant tag from the drop-down menu. - ConvertKit Tag
When there is a refund/cancellation, you can apply any ConvertKit tag to the user’s profile.
Simply select the relevant tag from the drop-down menu.
To create a new tag for this purpose, simply scroll down to the bottom of the menu and click on Create New Tag. - Drip Tag
When there is a refund/cancellation, you can apply any Drip tag to the user’s profile.
Simply select the relevant tag from the drop-down menu.
To create a new tag for this purpose, the tag must first be set up in your Drip account. Once done, it will immediately appear in the Drip drop-down. - Ontraport Tag
When there is a refund/cancellation, you can apply any Ontraport tag to the user’s profile.
Simply select the relevant tag from the drop-down menu.
To create a new tag for this purpose, the tag must first be set up in your Ontraport account. Once done, it will immediately appear in the Ontraport drop-down. - MailChimp Tag
When there is a refund/cancellation, you can apply any MailChimp tag to the user’s profile.
Simply select the relevant tag from the drop-down menu.
To create a new tag for this purpose, simply scroll down to the bottom of the menu and click on Create New Tag. - Add to Flodesk Segment
When there is a refund/cancellation, you can apply any Flodesk Segment to the user’s profile.
Simply select the relevant segment from the drop-down menu.
To create a new tag for this purpose, the tag must first be set up in your Flodesk account. Once done, it will immediately appear in the Flodesk drop-down after clicking the Refresh segments list… - Add to MailerLite Group
When there is a refund/cancellation, you can apply any MailerLite group t to the user’s profile. Simply select the relevant group from the drop-down menu.
To create a new tag for this purpose, simply scroll down to the bottom of the menu and click on Create New Tag. Once done, it will immediately appear in the MailerLite drop-down after clicking the Refresh segments list…
Refund tag will be applied or the webhook will trigger right away after the refund
Cancel End of the Current Period the tag or webhook will only trigger after the actual cancellation date
Cancel Immediately tag will be applied or the webhook will trigger right away.
Once done, click on SAVE and your Order Bump will be all set.
NB! The amount displayed on a checkout page will automatically include a comma on the amount of more than three digits.
Below is an overview of the various Order Bump Block settings:

Details
-
-
- Bump Headline
This setting will allow you to change the text of the Order Bump headline. - Text
This setting will allow you to change the text of the Order Bump text.

- Bump Headline
-
Headline
Font
This tool will help you fully customize the font style of your Order Bump headline.
-
-
- Font Family
Use this feature to change your headline text font type.
Click on the drop-down and select the font type you want. - Font Size
This changes the size of your headline text.
Simply click on the slider and move it left or right to increase or decrease the text size. - Line Height
This feature increases or decreases the space between the lines of headline text.
Click on the drop-down and select the line height you prefer. - Font Weight
This feature changes the weight of the headline text.
The font weight property sets how thick or thin characters in text should be displayed.
Click on the drop-down and select the font weight you prefer. - Text Color
This feature changes the color of your headline text.
To use custom colors, simply paste the hex code of the exact color you want in the field provided, e.g., #000000 = black, or click on the Color Picker button to the right of the field. This will open the Color Wheel, where you can select whichever color, you prefer.
- Font Family
-
Background
This setting will allow you to change the background color of the text of the Order Bump headline.

Related Articles
Working with Order Pages
How to setup an Order Summary Block